

Why Pricing Strategy Matters More Than Machine Speed
Pricing discipline is the single biggest factor separating profitable CNC shops from those struggling to break even. Forum users on Signs101 and CAMheads consistently report that underpricing is far more damaging than slow production speeds. A shop running at half capacity with healthy margins outperforms a fully loaded shop charging below cost.
Before setting any rate, you need a clear picture of your total cost of ownership. This includes your machine investment, consumable tooling, electricity, workspace overhead, software licenses, and your own labor. Owners evaluating whether to invest can explore how much CNC routers cost to benchmark realistic equipment budgets against projected service revenue.
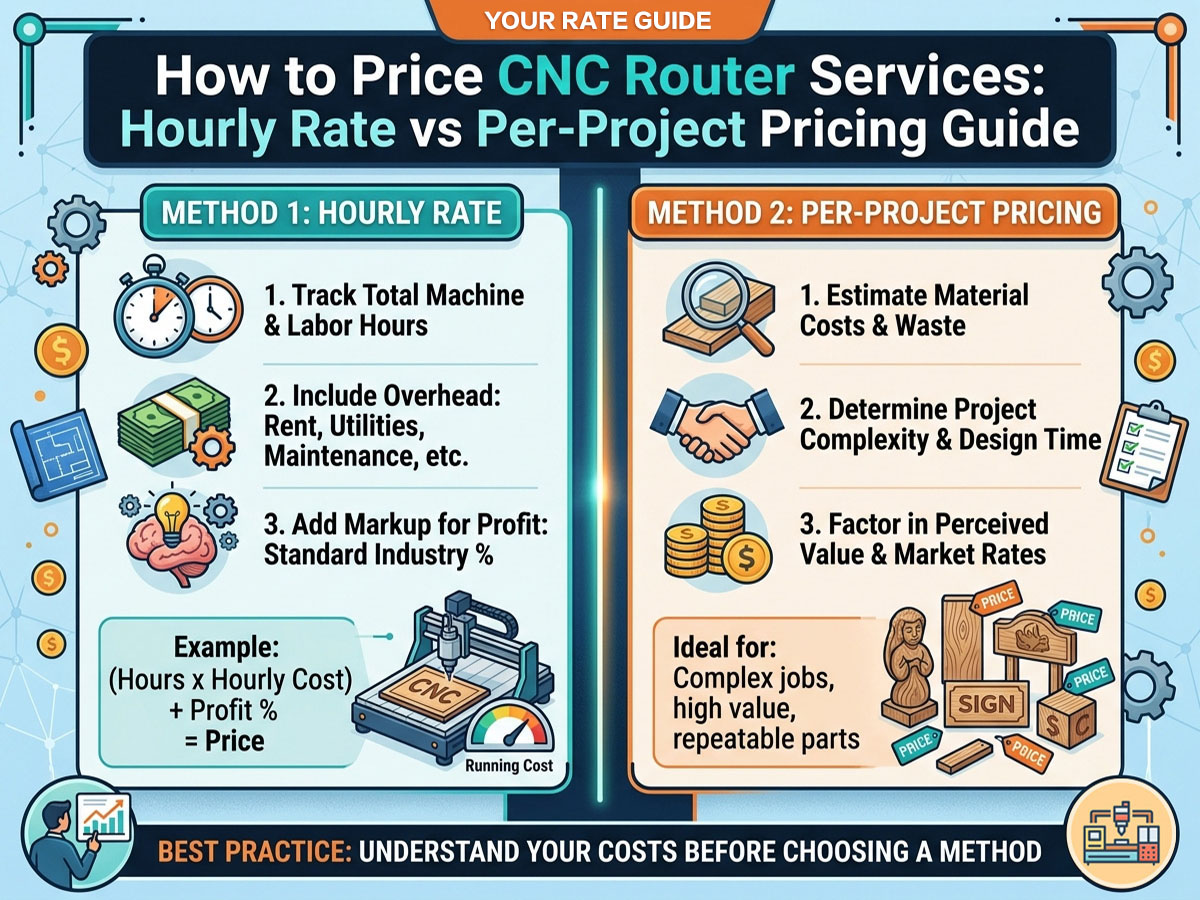
Hourly Rate Pricing: How It Works
Hourly pricing charges the client based on the total time your machine and operator spend on their job. This includes design time, setup, cutting, and cleanup. It is the most transparent method and works especially well for custom, one-off, or highly variable projects.
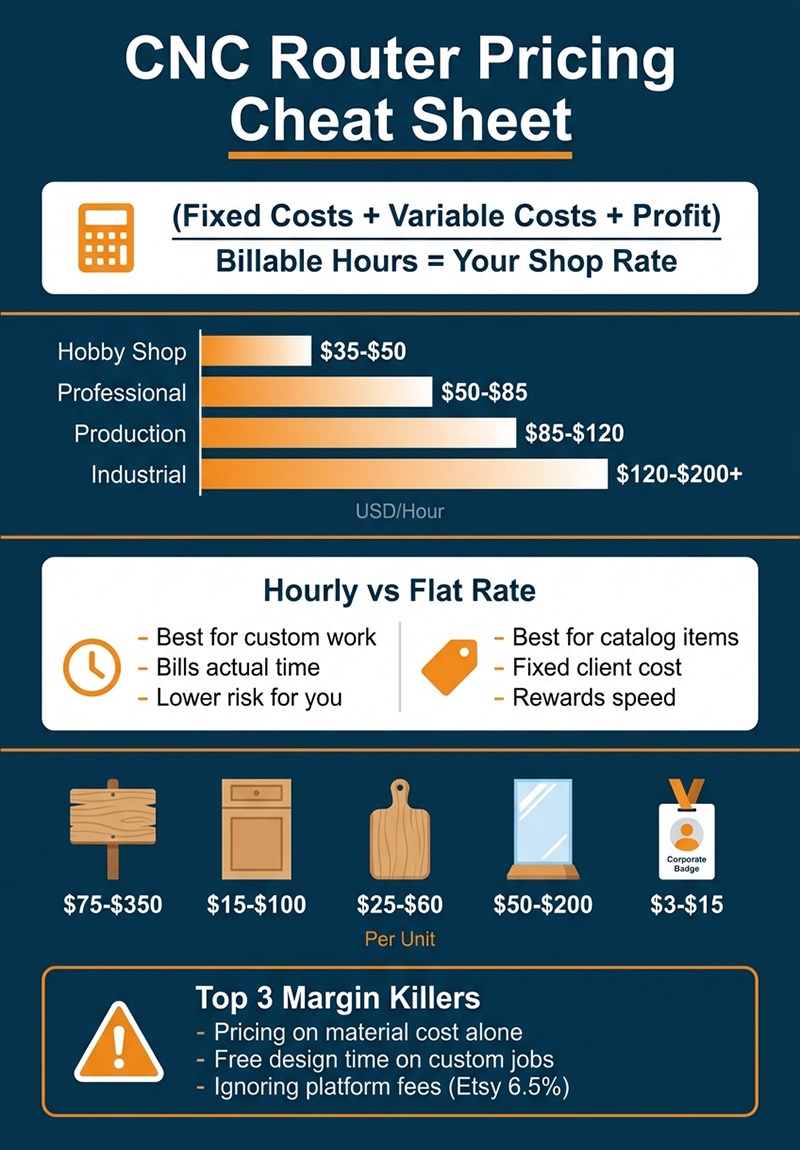
Typical CNC Router Hourly Rates
| Shop Type | Hourly Rate Range | Includes | Best For |
|---|---|---|---|
| Hobby/garage shop | $35 - $50/hr | Machine time, basic labor | Simple cuts, small batches |
| Small professional shop | $50 - $85/hr | Machine, labor, design | Signs, furniture parts |
| Mid-size production shop | $85 - $120/hr | Full overhead, software | Cabinetry, architectural |
| Industrial/5-axis facility | $120 - $200+/hr | Premium tooling, QC, metrology | Aerospace, prototyping |
| Measurement | USD per hour | Service components | Job category |
Operators on Router Forums and WOODWEB note that rates vary significantly by geography. Coastal U.S. shops typically charge 20 to 25% more than Midwest operations due to higher overhead costs. When comparing equipment options across regions, understanding the differences between Chinese CNC routers vs American and European models helps you select machinery that supports competitive pricing in your local market.
When Hourly Pricing Works Best
• Custom one-off projects: Jobs where design complexity is unknown upfront make flat-rate quoting risky. Hourly billing protects your margins on unpredictable work.
• Design-heavy commissions: Projects requiring significant CAD/CAM time before any cutting begins. Design hours at $35 to $75/hour should be billed separately from machine time.
• Prototype and R&D work: When clients need iterative cutting with multiple revisions, hourly billing avoids the trap of requoting every change order.
Per-Project Pricing: How It Works
Per-project pricing (also called flat-rate or fixed-price) quotes a single total for the entire job. The client knows exactly what they will pay before work begins. This method requires you to accurately estimate time, materials, and complexity upfront.
Per-Project Formula: (Material Cost + Machine Time x Rate + Design Labor + Overhead Allocation) x 1.25 to 1.35 Profit Margin
When Per-Project Pricing Works Best
• Standardized products: Signs, cutting boards, cabinet parts, and engraved gifts with predictable production times. You know exactly how long each unit takes.
• Repeat and batch orders: Corporate signage runs, wedding favor batches, and wholesale inventory, where you have historical time data from previous jobs.
• E-commerce and retail: Online storefronts on Etsy, Shopify, or Amazon require fixed visible prices. Shoppers exploring profitable laser engraved products expect clear per-item pricing without hourly surprises.
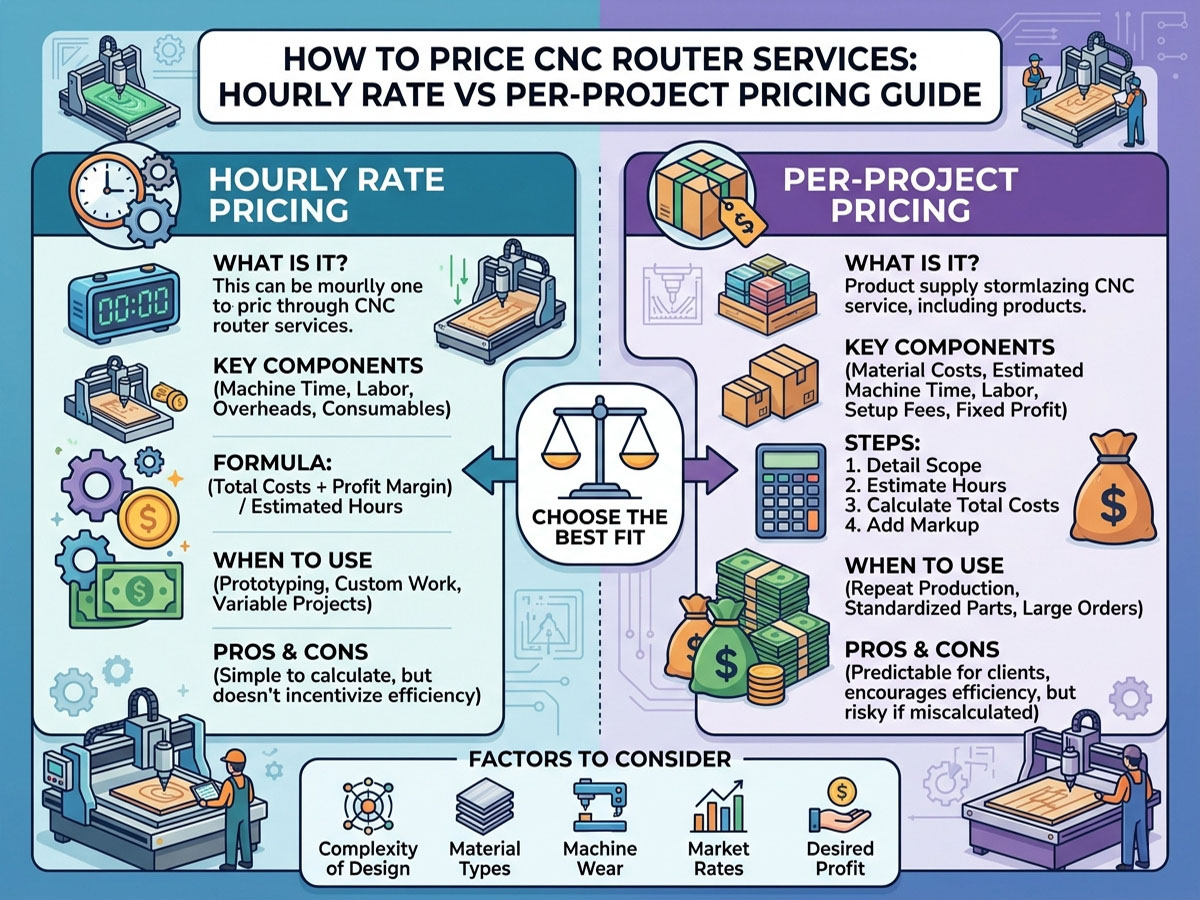
Hourly vs Per-Project: Side-by-Side Comparison
| Factor | Hourly Rate | Per-Project (Flat Rate) |
|---|---|---|
| Revenue predictability | Variable, depends on actual time | Fixed and predictable per job |
| Client transparency | Can feel open-ended to buyers | Clear upfront cost builds trust |
| Risk of undercharging | Low, you bill actual time spent | High if you underestimate scope |
| Best job types | Custom, complex, prototype work | Standardized, repeat, retail items |
| Profit margin control | Moderate, limited by clock | High, rewards efficiency gains |
| Scaling potential | Limited by billable hours | High, batch processing multiplies margins |
| Design fee handling | Bundled into hourly total | Billed separately or absorbed |
| Measurement | USD per hour of operation | USD per completed deliverable |
The most successful CNC businesses use both models strategically. Forum contributors on Signs101 and LumberJocks recommend quoting flat rates for your core product catalog while reserving hourly billing for custom requests outside your standard offerings.
How to Calculate Your True Shop Rate
Your shop rate is the minimum hourly figure you must charge to cover all costs and generate profit. Every pricing decision flows from this number. Shop owners considering whether CNC ownership fits their operation can weigh the decision by reviewing whether it is worthwhile for small businesses to buy CNC machines before committing to a rate structure.
Step 1: Total your monthly fixed costs
• Machine payment or depreciation allocation.
• Workspace rent, insurance, and utilities.
• Software licenses (CAD/CAM, nesting, ERP).
• Your base salary or owner draw.
Step 2: Estimate monthly variable costs
• Tooling and bit replacement (average $200 to $500/month for active shops).
• Electricity ($50 to $200/month depending on machine size).
• Maintenance consumables (lubricants, dust collection filters, vacuum seals).
Step 3: Determine billable hours
Estimate the realistic number of hours your machine will be cutting and earning revenue each month. At 60 to 80% utilization on a 40-hour work week, expect roughly 100 to 130 billable machine hours per month.
Step 4: Apply the formula
Shop Rate = (Total Fixed Costs + Total Variable Costs + Target Profit) / Billable Hours per Month
If your total monthly costs are $6,000 and you target $2,000 in monthly profit across 120 billable hours, your minimum shop rate is approximately $67 per hour. Any job priced below this number loses money regardless of how busy the machine stays.
Pricing Real-World CNC Products: Quick Reference
These ranges reflect actual market data from forum discussions on CAMheads, Signs101, Router Forums, and Reddit r/CNC communities. Operators planning to enter the sign-making vertical can explore a detailed roadmap for starting a CNC sign making business to align pricing with proven demand.
• Custom wood signs (12x24 to 24x48): $75 to $350 depending on material, complexity, and finishing. V-carved text signs at the low end, 3D relief carved pieces at the high end.
• Cabinet parts (nested, per sheet): $15 to $35 per sheet for basic cutting. Full processing with edge banding coordination commands $50 to $100 per sheet.
• Laser engraved cutting boards: $25 to $60 per board. Batch production of 10 or more boards reduces per-unit cost and increases margin significantly.
• Acrylic signage and displays: $50 to $200 per piece. Premium pricing applies for LED-lit edge applications and multi-layer assemblies.
• Corporate logo engraving (batch): $3 to $15 per unit at volume. Minimum order thresholds of $150 to $250 protect against unprofitable small runs.
• 3D relief carving and art pieces: $200 to $1,000+. These projects command premium pricing due to extended machine time and specialized programming expertise.
Common Pricing Mistakes That Destroy Margins
Experienced CNC machine operators across Reddit, WOODWEB, and Signs101 warn against these recurring errors. Understanding your laser engraver costs and earning potential, and accurately forecasting demand prevents most of these pitfalls.
✓ Pricing based on material cost alone without factoring machine time, overhead, or design labor
✓ Forgetting to charge setup fees for one-off jobs that require custom fixturing or file preparation
✓ Using competitor prices as your baseline without knowing their cost structure or whether they are actually profitable
✓ Giving free design time on custom projects, then absorbing hours of unpaid CAD work
✓ Offering bulk discounts that push per-unit profit below your break-even threshold
✓ Charging the same rate for simple plywood cuts and complex hardwood 3D carvings
✓ Ignoring platform fees (Etsy 6.5%, payment processing 2.9%) when setting online retail prices
✓ Failing to build a 10 to 15% waste buffer into material cost estimates
The Hybrid Approach: Best of Both Models
Most profitable CNC service businesses do not commit exclusively to hourly or per-project pricing. They use a hybrid model that applies the right method to each job type.
• Catalog products at fixed prices: List your standard offerings (signs, plaques, cutting boards, cabinet parts) with clear per-item pricing. These are your bread-and-butter revenue generators.
• Custom work at hourly + materials: Quote custom commissions at your shop rate plus materials with a 25% markup. Communicate estimated hours upfront so clients know the expected range.
• Design fees billed separately: Charge $35 to $75 per hour for CAD/CAM work, separate from machine time. This protects your most valuable intellectual labor.
• Minimum job charges: Set a floor of $50 to $150 per job to prevent small orders from consuming disproportionate setup time. Forum users on CAMheads and Signs101 universally recommend minimum charges.
• Rush and priority surcharges: Add 25 to 50% for expedited turnaround. Clients who need next-day delivery are willing to pay for prioritization.
Selecting the right machine for your pricing model matters as much as the pricing itself. Owners exploring equipment options benefit from guidance on how to choose the right CNC router to match production capability with revenue goals. For those evaluating complementary product lines, reviewing the top laser cutting products to sell on Amazon and Shopify can identify high-margin items worth adding to your catalog.
Frequently Asked Questions
What is a good hourly rate to charge for CNC router work?
Most professional CNC shops charge between $50 and $120 per hour depending on machine capability, complexity, and geographic location. Garage-based hobby shops start around $35 per hour, while industrial 5-axis operations can exceed $150 per hour.
Should I charge separately for design and setup time?
Yes. Design and programming time at $35 to $75 per hour should be billed independently from machine cutting time. Bundling design into your cutting rate undervalues your most skilled labor and compresses margins on complex projects.
How do I set a minimum job charge?
Calculate the cost of your average setup time (loading material, zeroing the machine, running a test cut) and add a small profit buffer. Most shops set minimums between $50 and $150 to ensure even the smallest jobs contribute positively to overhead coverage.
Is per-minute pricing better than per-hour for laser engraving?
Per-minute pricing ($1 to $5 per minute) offers more granular accuracy for short laser engraving jobs. It prevents undercharging on quick 10-minute tasks where a full hourly rate feels excessive to clients, but a flat rate might undervalue your time.
How often should I review and adjust my pricing?
Review pricing every three to six months. Material costs, electricity rates, tooling expenses, and local market conditions shift regularly. Shops that set prices once and never revisit them gradually erode margins without realizing it.
Should I offer volume discounts on batch CNC orders?
Volume discounts of 5 to 20% are appropriate for large batch orders because setup time is amortized across more units. Always verify that the discounted per-unit price still exceeds your break-even cost before committing to a volume rate.
Final Thoughts
Pricing CNC router and laser services is not a guessing game. It is a calculation grounded in your actual costs, realistic utilization, and the value you deliver to your market. Whether you lean toward hourly billing, per-project quotes, or a hybrid approach, the foundation remains the same: know your shop rate, protect your margins, and never undervalue the expertise behind every cut.
Portable CNC machines have become a must-have tool for hobbyists, small business owners, and professionals who need precision and mobility in one compact package. These machines are designed to be easy to transport while still delivering the same level of accuracy and quality as their larger counterparts. Whether you're working on-site, in a small workshop, or need flexibility for various projects, portable CNC machines make it possible to tackle a wide range of tasks without taking up too much space.
In this article, we'll dive into the key features that make a CNC machine truly portable and why these machines are perfect for small-scale projects. We'll also explore how they compare to larger models in terms of precision, and their impact on the manufacturing industry, and provide tips on choosing the right machine for your needs. Ready to explore the world of portable CNC? Let's get started!
What Makes a CNC Machine Truly Portable? Key Features to Look For
When you're in the market for a portable CNC machine, it's important to know what specific features make a machine truly portable without sacrificing precision or functionality. A portable CNC machine should not only fit into your workspace but also be easy to move from one job site to another. For professionals working in various locations, having a lightweight and versatile machine that doesn't compromise on quality can make all the difference. This guide covers the essential features that ensure portability while maintaining the high standards needed for CNC operations.
Knowing about the key features that define a portable CNC machine will help you make an informed decision, whether you're setting up a mobile workshop or need flexibility for on-site work. Below, we break down these features and why they matter when choosing the right machine for your needs.
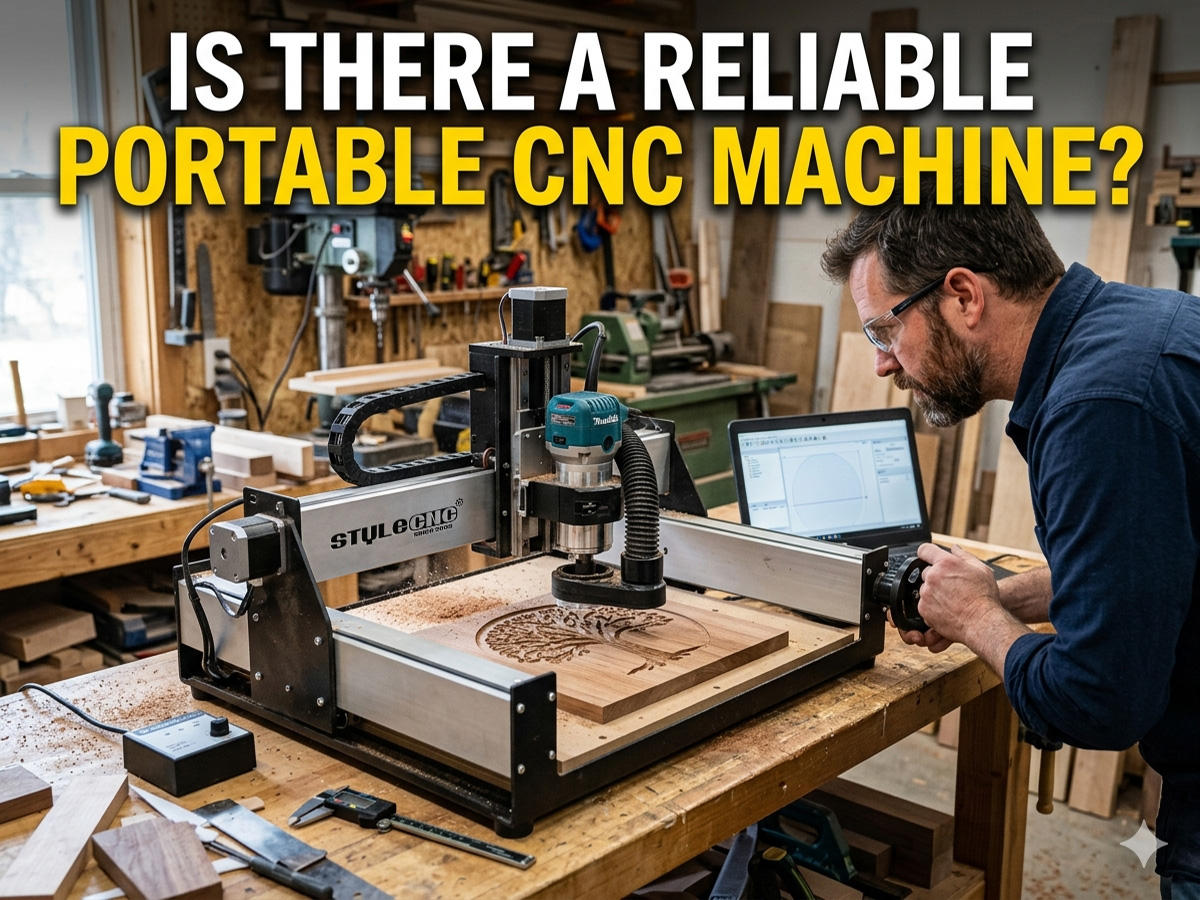
Key Features to Look for in a Portable CNC Machine
• Compact Design and Lightweight Build: Portability starts with the design. A CNC machine that's easy to move around should have a compact structure that doesn't take up much space. Choose a machine made with lightweight materials that offer durability without the weight, making transportation easier.
• Power Source Flexibility: Being able to use the machine in various locations requires flexibility in power options. Look for machines that can run on standard electrical outlets or even have the ability to work with alternative power sources like batteries, making them adaptable to remote work environments.
• User-Friendly Interface: A portable CNC machine should have an intuitive interface that makes operation simple, even for beginners. Easy-to-navigate software and controls are essential for making quick adjustments and ensuring smooth operation when you're on the go.
• Durability and Robustness: Even a portable machine needs to be tough. Check for solid construction, such as a sturdy frame, that can withstand the rigors of frequent movement. A durable CNC machine ensures that even in transit, it will maintain accuracy and longevity.
• Quick Setup and Tear Down: Look for machines that can be set up or packed away quickly. The more efficient the setup process, the less time you spend on prep and teardown, especially when moving between jobs or locations.
• High Precision in a Small Package: A portable CNC machine should not sacrifice precision for portability. It's crucial that even in a smaller form, the machine delivers the same level of accuracy as its larger counterparts to ensure your projects meet professional standards.
Top Benefits of Using a Portable CNC Machine for Small-Scale Projects
Portable CNC machines are designed to be compact, lightweight, and highly efficient, making them the perfect choice for those who need precision and mobility without sacrificing quality. Whether you're a hobbyist or a small business owner, portable CNC machines can improve your workflow and save you time and resources. Let's explore the top benefits that come with using these machines for your small-scale projects.
Increased Flexibility and Mobility
Portable CNC machines allow you to work in different environments, whether it's a workshop, an on-site project, or at a client's location. This flexibility helps you take on a wider range of jobs without the need for a large, permanent setup, making it easier to meet the demands of your customers.
Cost-Effective Solution
For small-scale projects, investing in a portable CNC machine can be more affordable than traditional larger machines. They offer the same high-level precision and efficiency but at a fraction of the cost, making them an ideal solution for businesses with a limited budget or hobbyists just starting.
Space-Saving Design
Portable CNC machines are compact and can be stored easily when not in use. If you have limited space in your shop or workspace, a smaller CNC machine allows you to maximize the area available without compromising on your project quality.
Ease of Use and Setup
Most portable CNC machines are user-friendly and require minimal setup time, allowing you to start working right away. This can be especially beneficial for small-scale projects where time is of the essence, helping you complete tasks faster and with fewer hassles.
Precision and Quality in Small-Scale Work
Despite their small size, portable CNC machines maintain the same high level of precision as their larger counterparts. Whether you're cutting wood, plastic, or metal, these machines ensure that your small-scale projects are executed with accuracy and attention to detail, leading to professional results every time.
Reduced Overhead Costs
Since these machines are portable and versatile, you can use them for a variety of tasks without needing to invest in multiple machines. This helps reduce overhead costs, as you don't have to purchase specialized equipment for each job.
Are Portable CNC Machines as Accurate as Their Larger Counterparts?
Portable CNC machines have gained popularity for their flexibility and compact design, but one common question that arises is whether they can match the precision of their larger counterparts. While portable CNC machines may not have the sheer size and power of industrial models, they can still deliver exceptional accuracy for most small-scale projects. Thanks to advancements in technology, many portable machines are designed to achieve high precision levels comparable to larger machines.
These machines often use advanced control systems, high-quality spindles, and precision components that enable them to perform intricate tasks with minimal error. For many tasks such as engraving, small part cutting, and detailed carving, portable CNC machines can offer results that are just as accurate as larger models, all while being more cost-effective and space-efficient.
Consistent Precision with Smaller Jobs
Portable CNC machines are ideal for smaller-scale operations and can handle intricate designs with impressive accuracy. They are built to cut, carve, and engrave on various materials with a high degree of precision, making them perfect for hobbyists, makers, or small businesses focusing on detail-driven projects.
Ideal for Prototyping and Custom Work
Portable machines are often used in prototyping and one-off custom jobs where precision is crucial. They can produce parts with tight tolerances that meet the needs of industries such as jewelry, custom signage, and electronics.
Precision Technologies Used
Modern portable CNC machines come equipped with features like high-precision stepper motors, ball screw mechanisms, and advanced CNC controllers. These components contribute to achieving better accuracy, even in machines that are smaller and lighter than their industrial counterparts.
The Impact of Portable CNC Machines on the Global Manufacturing Industry
Portable CNC machines have made a significant impact on the global manufacturing industry, offering benefits that were once exclusive to large-scale operations. These compact machines provide manufacturers with flexibility, cost-efficiency, and access to precision in ways that were previously out of reach for smaller businesses or individual makers.
One of the key advantages is the ability to work on-site or in smaller workshops, eliminating the need for expensive industrial setups. This has democratized manufacturing, enabling startups and small businesses to enter the market without hefty upfront costs. Additionally, portable CNC machines allow for faster prototyping, which is essential for industries that require rapid iteration, like product design and innovation.
They've also improved accessibility for manufacturers in remote or underserved regions, reducing the dependency on large factories. This accessibility fosters local production, helping to shorten supply chains and reduce lead times. Overall, portable CNC machines have shifted the dynamics of the manufacturing industry, enabling more businesses to compete on a global scale and helping speed up production processes in diverse industries.
How to Choose the Right Portable CNC Machine for Your Needs?
Choosing the right portable CNC machine for your needs can be a game-changer, whether you're a hobbyist, small business owner, or part of a larger operation. The right machine will offer precision, efficiency, and versatility without taking up too much space or breaking the bank. Here's how you can approach the selection process step by step:
Step 1: Define Your Project Requirements
Before diving into specifications, take a moment to consider the materials you'll be working with, the complexity of your designs, and your desired production speed. Are you primarily cutting wood, metal, or plastic? This will guide you toward the right machine.
Step 2: Consider Size and Portability
Since you're looking for a portable CNC machine, its size and weight should be top priorities. Check if it can fit in your workspace while still offering the capacity to handle your projects. A compact yet robust machine can help you work efficiently without sacrificing mobility.
Step 3: Look at the Machine's Precision and Accuracy
Precision is key in CNC work. Make sure the machine you choose provides the level of accuracy you need for your designs. Check the specifications for repeatability and resolution to ensure it can handle the intricacies of your projects.
Step 4: Evaluate the Control System and Software Compatibility
Look for a machine with an easy-to-use control system that works well with your preferred CAD/CAM software. User-friendly interfaces and software compatibility can significantly reduce the learning curve and improve your workflow.
Step 5: Assess Power and Performance
Portable CNC machines come with varying power ratings. Ensure the machine has the right motor power and speed to meet your production needs. A machine that strikes the right balance between power and efficiency will make your projects run smoothly.
Choose a brand with a strong reputation for customer service and support. A good warranty and after-sales support can save you time and money in case of any issues down the line.
The Limitations of Portable CNC Machines and How to Overcome Them
Portable CNC machines are a fantastic choice for many small-scale and home-based projects due to their compact size and versatility. However, like any technology, they do come with certain limitations that users should be aware of. One of the most common challenges is the limited workspace or smaller cutting areas compared to larger, industrial models. This can restrict the scale of the projects you can tackle, especially when working with larger materials or more complex designs.
Additionally, portable CNC machines may have lower motor power and cutting speeds, making them less suitable for heavy-duty or high-volume production. Precision might also be a concern, as smaller machines may not offer the same level of repeatability and fine detail that larger machines can provide. Finally, the complexity of programming and limited support for advanced CAD/CAM software may make it harder for users to optimize their machines for specific needs.
Despite these limitations, there are effective ways to overcome these challenges and ensure your portable CNC machine remains productive and efficient. Here are some solutions:
• Maximize Workspace Efficiency: Utilize rotating or adjustable fixtures to handle larger materials in smaller spaces, or consider investing in modular CNC workstations that can be expanded as needed.
• Optimize Cutting Speed and Power: Choose a machine with variable speed and power settings to adjust based on material type, and keep the cutting speeds within recommended ranges to avoid overload.
• Upgrade Precision: For more detailed work, consider investing in high-quality tools and accessories designed to enhance precision, such as precision collets, higher-grade motors, and rigid machine setups.
• Enhance Software Compatibility: Use compatible CAD/CAM software that integrates seamlessly with your portable CNC machine to maximize its capabilities and ensure smooth programming and workflow.
• Regular Maintenance: Perform regular maintenance, such as cleaning the machine, lubricating moving parts, and checking for wear and tear to ensure the machine operates at peak performance.
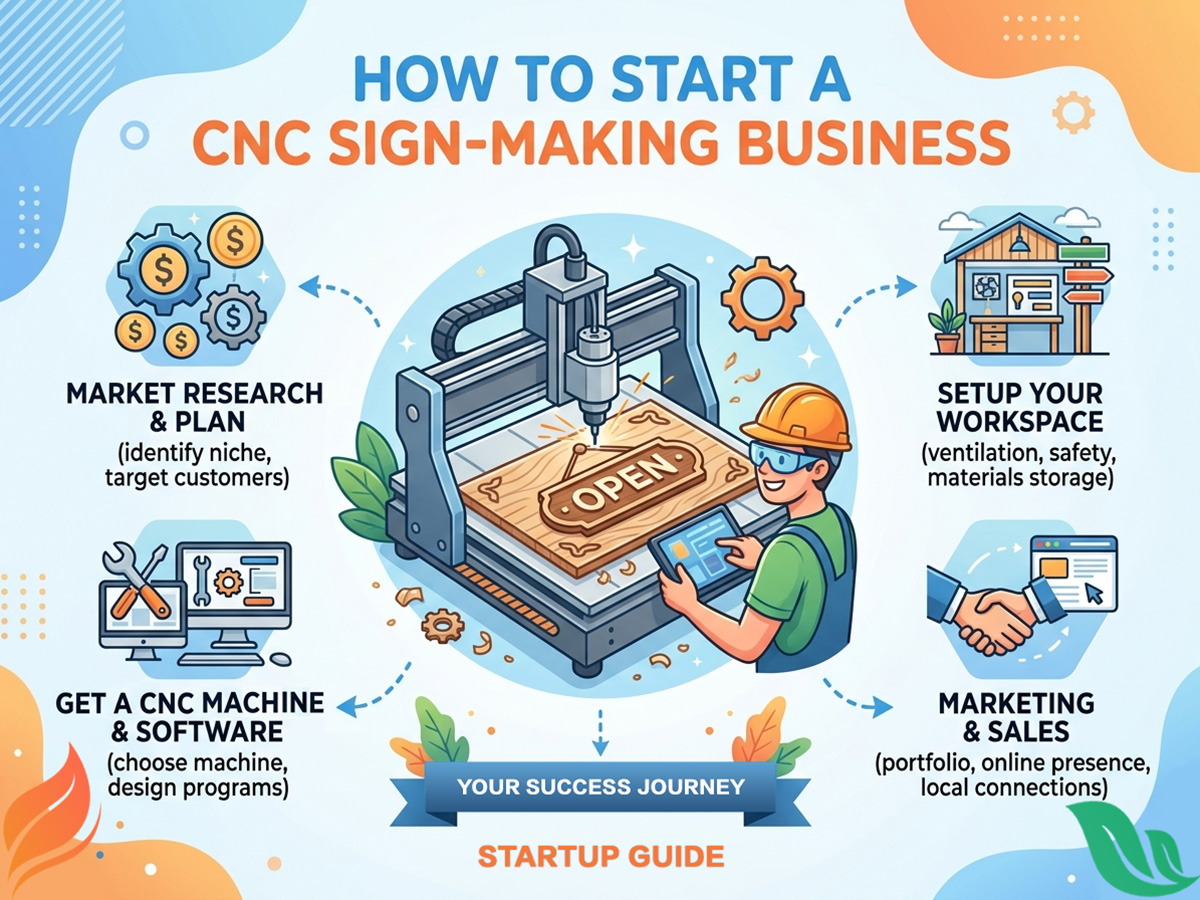
How Much Does it Cost to Start a CNC Sign-Making Business?
A CNC sign-making business typically requires $8,000 to $50,000 in startup capital. Entry-level setups with a hobby CNC router, design software, and basic materials start around $8,000, while mid-range operations with industrial equipment, dust collection, and a dedicated workspace range from $20,000 to $50,000. Profit margins on custom CNC signs generally fall between 40% and 65%, depending on material choice, design complexity, and order volume.
Why CNC Sign Making Is a Profitable Business Opportunity?
The global signage market is valued at nearly $40 billion and continues to grow at a compound annual growth rate of over 4%, driven by demand from retail, hospitality, real estate, and corporate branding. Within this landscape, custom CNC-routed and laser-engraved signs occupy a premium niche. Businesses and consumers increasingly seek dimensional, handcrafted-looking signage that vinyl plotters and flat-printed banners simply cannot replicate. A CNC router transforms raw sheets of wood, acrylic, PVC, foam, and aluminum into high-margin finished products, often while the operator works on design, finishing, or sales in parallel.
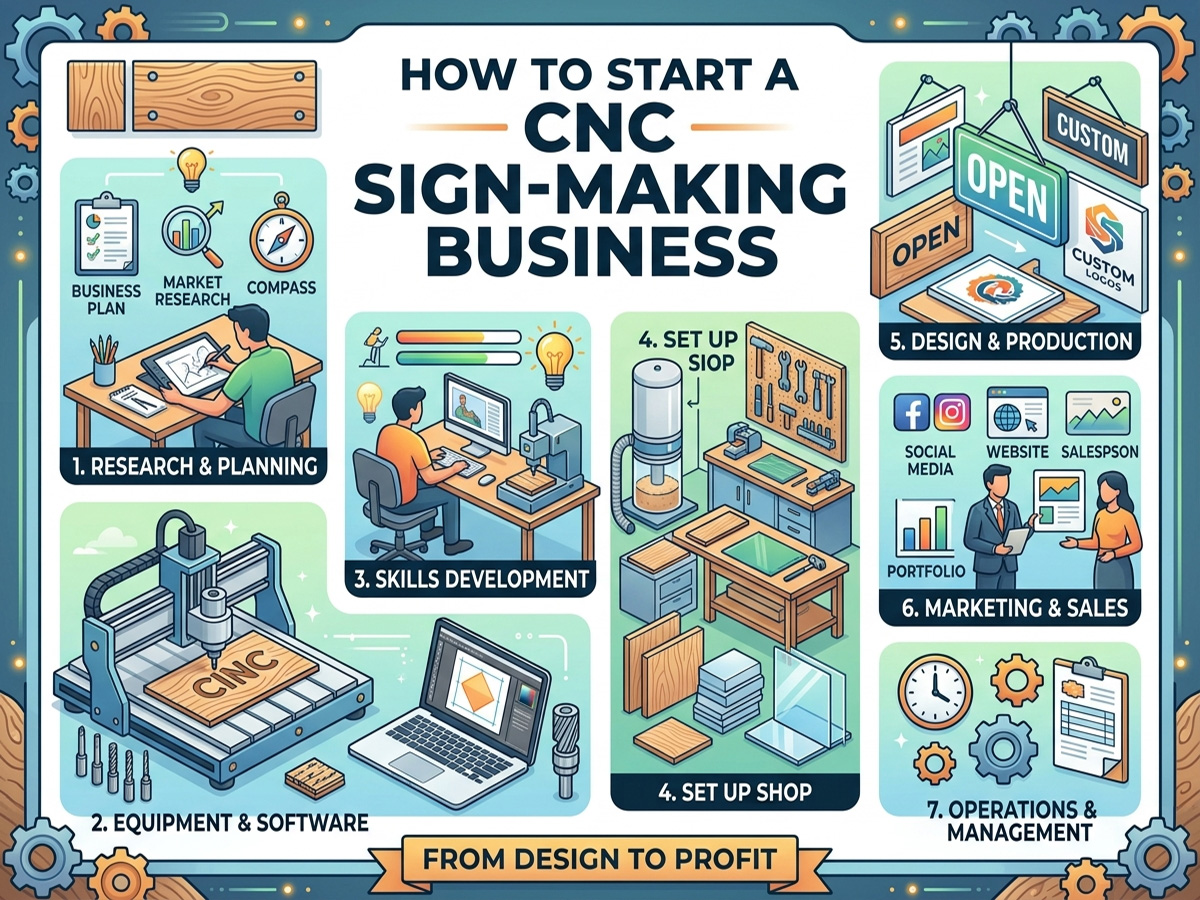
Whether you plan to run a home-based side business or open a full-service sign shop, CNC sign making offers scalable entry points, low per-unit material costs, and strong repeat-order potential. This guide breaks down the real-world startup costs, essential equipment, profitable sign types, pricing strategies, and operational steps needed to launch and grow a successful CNC sign-making business.
What CNC Sign Making Involves?
CNC sign making uses computer-controlled cutting, carving, and engraving to produce custom signage from a variety of substrates. The operator creates or imports a vector design in CAD/CAM software, generates toolpaths, and sends instructions to the machine. The CNC wood router or laser system then removes material with precision measured in thousandths of an inch, producing dimensional letters, V-carved text, 3D relief panels, channel letters, ADA-compliant tactile signs, and decorative wall art.
Common sign-making processes include 2D profile cutting (letters and shapes), V-carving (classic tapered lettering), 3D relief carving (sculpted logos and imagery), pocket routing (recessed backgrounds), and laser engraving (fine detail on wood, acrylic, and coated metals). Most sign shops combine two or more of these techniques on a single project to create multi-layered, visually rich signage.
Startup Cost Breakdown
Understanding your total investment before purchasing equipment prevents undercapitalization, which is the leading cause of failure among new sign businesses. The table below outlines realistic cost ranges for three common entry points.
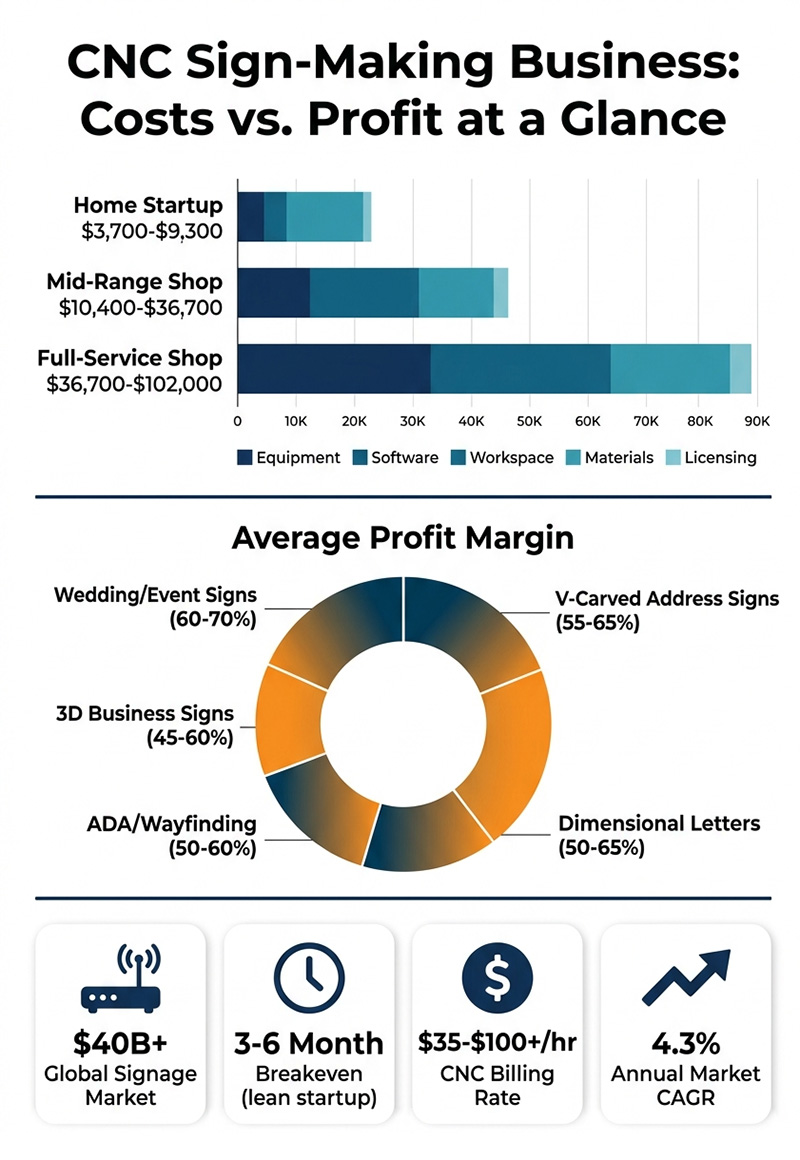
| Cost Category | Home Startup | Mid-Range Shop | Full-Service Shop |
|---|---|---|---|
| CNC Router or Laser | $2,000 - $5,000 | $5,000 - $20,000 | $20,000 - $60,000+ |
| CAD/CAM Software | $350 - $700 | $700 - $1,500 | $1,500 - $3,000 |
| Tooling and Bits | $200 - $500 | $500 - $1,200 | $1,200 - $2,500 |
| Dust Collection System | $150 - $400 | $500 - $2,000 | $2,000 - $5,000 |
| Raw Materials (Initial) | $300 - $800 | $800 - $2,000 | $2,000 - $5,000 |
| Finishing Supplies | $200 - $500 | $500 - $1,000 | $1,000 - $2,500 |
| Workspace Setup | $0 (garage/shed) | $1,000 - $5,000 | $5,000 - $15,000 |
| Business Licensing/Insurance | $300 - $800 | $800 - $2,000 | $2,000 - $4,000 |
| Marketing and Website | $200 - $600 | $600 - $2,000 | $2,000 - $5,000 |
| Total Estimated Range | $3,700 - $9,300 | $10,400 - $36,700 | $36,700 - $102,000 |
Forum discussions on CNCZone and WOODWEB consistently confirm that new sign makers who start lean with a hobby CNC router in a garage or workshop can break even within three to six months when they focus on local B2B clients and maintain disciplined pricing.
Essential Equipment for a CNC Sign Shop
Your choice of CNC machine is the single most important equipment decision. It determines which materials you can work with, the maximum sign size you can produce, and the level of detail available for intricate designs.
CNC Router vs. Laser Engraver
A CNC router excels at cutting and carving thick substrates such as HDU foam, solid wood, PVC sheet, and aluminum composite. It handles dimensional lettering, deep V-carving, and full 3D relief work. A laser engraving machine delivers superior fine-detail engraving on thinner materials, including acrylic, coated metals, leather, and glass. Many successful sign shops operate both machine types to cover the full range of customer requests.
Equipment Checklist
• CNC router (4' x 8' bed recommended for standard sheet goods)
• Laser engraver or cutter (CO2 for non-metals, fiber for metals)
• Dust collection and air filtration system
• V-bits, ball nose bits, compression bits, and engraving bits
• CAD/CAM software (VCarve Pro, Aspire, or equivalent)
• Clamps, hold-down systems, and spoilboard surfacing tools
• Finishing station with spray equipment, sandpaper, and sealants
• Digital calipers, square, and measuring tools for quality control
Understanding how much CNC routers cost across different machine classes helps you match your investment to your projected revenue and the types of signs your market demands.
Most Profitable CNC Sign Types
Not all sign projects deliver equal margins. Experienced sign makers on the Signs101 and CAMheads forums emphasize that profitability depends on matching production efficiency with perceived customer value. The highest-margin sign types combine relatively low material costs with strong visual impact and premium pricing.
| Sign Type | Materials | Avg. Selling Price | Profit Margin | Demand Level |
|---|---|---|---|---|
| Dimensional Letters | HDU, PVC, Wood | $150 - $800+ | 50% - 65% | High |
| V-Carved Address Signs | Cedar, Redwood | $75 - $300 | 55% - 65% | High |
| 3D Business Signs | HDU, Acrylic, Alu | $300 - $2,500+ | 45% - 60% | Medium-High |
| Backlit Acrylic Signs | Acrylic, LED strips | $200 - $1,200 | 40% - 55% | Growing |
| ADA/Wayfinding Signs | Acrylic, PVC | $50 - $400 each | 50% - 60% | Steady |
| Real Estate Signs | HDU, Aluminum | $200 - $600 | 45% - 55% | High |
| Wedding/Event Signs | Wood, Acrylic | $50 - $250 | 60% - 70% | Seasonal |
| POP Retail Displays | MDF, PVC, Foam | $300 - $1,500 | 40% - 55% | Medium |
Working with versatile substrates like acrylic and plastic opens up product lines such as backlit lobby signs, edge-lit displays, and layered dimensional graphics that command premium pricing from commercial clients.
Pricing Your CNC Signs for Profit
Pricing is where most new sign makers struggle. Undercharging is the fastest route to burnout and business failure. Veteran sign shop owners on the CAMheads Forum report that CNC routing time in the sign industry typically bills between $35 and $100+ per hour, depending on complexity and market. Your pricing formula should account for every cost center.
Pricing Formula
Selling Price = Material Cost + Labor (design + production + finishing) + Machine Time + Overhead + Profit Margin
• Material cost: Calculate per-sheet cost divided by the number of signs per sheet, plus waste allowance (typically 15% to 20%).
• Design time: Charge for custom design work at your hourly rate, even if the machine does the cutting. Design time is real labor.
• Machine time: Track actual run times per project to build an accurate rate card over your first 30 to 60 days.
• Finishing labor: Sanding, priming, painting, and clear-coating can take as long as the CNC run itself on complex signs.
• Overhead allocation: Rent, utilities, insurance, software subscriptions, and bit replacement must be spread across every job.
• Profit margin: Target a minimum 40% margin on retail orders and 25% to 30% on wholesale or subcontract work.
Step-by-Step Guide to Launching Your Business
1. Define Your Niche and Target Market
Successful CNC sign businesses rarely try to serve every customer type. Identify whether you will focus on commercial signage (restaurants, retail, offices), residential (address plaques, home decor), event and wedding signage, real estate, or wholesale subcontracting for existing sign shops. Each niche has different pricing dynamics, order volumes, and marketing channels.
2. Register Your Business and Secure Permits
Register as an LLC or sole proprietorship, obtain your local business license, and check zoning regulations if you plan to operate from a residential property. Secure general liability insurance (typically $500 to $1,200 annually for a small sign shop) and consider product liability coverage for outdoor-installed signage.
3. Set Up Your Workspace
A single-car garage can accommodate an entry-level CNC router, dust collection system, and finishing area. Ensure adequate electrical supply (most mid-range CNC routers require a dedicated 20-amp circuit), ventilation for finishing fumes, and organized material storage. As volume grows, plan to transition into a commercial or light-industrial space.
4. Invest in the Right Equipment
Start with the machine that matches your primary sign types. A 4' x 8' CNC router handles standard sheet goods and covers most commercial sign dimensions. If your niche involves detailed engraving on smaller items, a laser engraver with strong cost-to-benefit ratio may be the smarter first purchase. Review CNC software options compatible with your machine to ensure a smooth design-to-production pipeline.
5. Build a Portfolio and Start Marketing
Create five to ten sample signs showcasing different materials, techniques, and styles. Photograph them professionally with consistent lighting and backgrounds. Launch a simple website with a portfolio gallery, pricing inquiry form, and local SEO optimization. Join your local chamber of commerce, visit sign shops that do not offer CNC routing (many outsource this work), and list your services on platforms where contractors and event planners search for vendors.
6. Develop Efficient Production Workflows
Batch similar jobs together to minimize tool changes and material handling. Use nesting software to maximize sheet utilization and reduce waste to under 15%. Create templates for recurring sign types (address plaques, standard letter sizes, common logo layouts) to cut design time on repeat orders. Track your time on every job for the first 90 days to build accurate pricing benchmarks.
Materials Guide for CNC Sign Making
Choosing the right substrate for each project directly affects durability, appearance, machining efficiency, and profit margin. Below is a reference guide to the most commonly used sign-making materials.
| Material | Best Applications | Key Properties | Outdoor Lifespan |
|---|---|---|---|
| HDU Foam | Monument signs, 3D carved panels | Lightweight, waterproof, paintable | 20+ years |
| Cedar / Redwood | Rustic signs, address plaques | Natural beauty, weather-resistant | 10 - 15 years (sealed) |
| PVC Sheet | Cut-out letters, flat panel signs | Waterproof, affordable, easy to cut | Up to 80 years |
| Acrylic | Backlit signs, lobby displays | Clear/colored, polished finish | 5 years outdoor |
| MDF | Indoor signs, templates | Smooth surface, low cost | Indoor only |
| Aluminum Composite | Modern exterior signage | Rigid, weather-resistant, sleek | 15+ years |
| Hardwood (Maple, Walnut) | Premium interior signs, plaques | Rich grain, high-end look | Indoor / covered |
Frequently Asked Questions
What size CNC router do I need for sign making?
A 4' x 8' bed is the industry standard for sign work because it handles full-size sheet goods. Smaller 2' x 4' machines work for address plaques and small interior signs but limit commercial opportunities.
Can I start a CNC sign business from my garage?
Yes. Many profitable sign businesses began in residential garages or workshops. Ensure proper dust collection, electrical capacity, and check local zoning rules before starting production.
How long does it take to make a CNC sign?
Simple V-carved address signs take 30 to 60 minutes of machine time. Complex 3D business signs with multiple layers and finishing can require 4 to 8 hours total, including design, routing, and painting.
Is a laser or CNC router better for sign making?
Both serve different purposes. CNC routers excel at thick materials and dimensional carving. Lasers handle fine engraving and thin-material cutting. Operating both machine types covers the widest range of customer requests.
What software do sign makers use with CNC machines?
VCarve Pro and Aspire by Vectric are the most popular choices among CNC sign makers. Other widely used options include EnRoute Pro, ArtCAM, and Fusion 360 for more complex 3D work.
Do I need design skills to start a CNC sign business?
Basic vector design skills are essential. Most CNC sign software includes templates and tutorials that shorten the learning curve. Proficiency in Adobe Illustrator or CorelDRAW is a strong advantage.
Turn Your CNC Investment into a Profitable Sign Business
CNC sign making combines creative craftsmanship with scalable manufacturing, creating a business model with strong margins and diverse revenue streams. The barriers to entry are lower than ever, with capable machines available across every budget tier and a global signage market that continues to expand.
The key to long-term success lies in choosing reliable, precision equipment that grows with your business, mastering efficient production workflows, and pricing your work to reflect its true value. STYLECNC offers a complete lineup of CNC routers and laser engraving machines engineered for sign-making applications, backed by technical training, lifetime support, and global shipping to help you launch with confidence.
Ready to start your CNC sign-making business? Contact STYLECNC for a free consultation and equipment recommendation tailored to your production goals and budget.
Ask whether a laser needs ventilation and the honest answer takes one word; the useful answer explains what to build. This guide covers what each material releases, whether to vent outdoors or filter and recirculate, and how much airflow the enclosure really needs.
Chip and dust from routers is a separate system, already covered in the dust collection guide for CNC wood routers; this page handles smoke and gas.

The Short Answer Is Always Yes
Every job vaporizes material, and vaporized material becomes airborne particulate plus gases. That holds for a 5W diode doodling on plywood as much as for an industrial cabinet.
Smell is a warning label, not the hazard itself. The fine fraction of laser smoke is largely odorless and invisible, which is why OSHA treats laser-generated air contaminants as a workplace exposure issue rather than a comfort issue.
The rule across every laser engraving machine class is simple: if the beam touches it, the byproducts belong outdoors or inside a filter, never in the room air.
What Each Material Puts in the Air
Acrylic releases its own building block, MMA monomer, with a sharp solvent odor that announces itself instantly. It is manageable with good flow, and the full picture sits in STYLECNC's guide on whether laser cutting acrylic is toxic.
MDF adds formaldehyde from its glue lines to the usual wood particulate, and EPA indoor air guidance flags that compound specifically. Solid wood is gentler but still delivers fine smoke and aldehydes.
Powder coat ablation on tumblers and panels releases mixed organics and pigment particulate, and bare-metal marking adds metal oxide fume, which is why even a compact fiber laser marking machine hood earns its filter.
PVC and vinyl are the hard ban. Their chlorine leaves as a gas that turns corrosive on contact with moisture, attacking optics, rails, and airways in one pass. No CO2 laser cutting machine is immune, and no job is worth it.
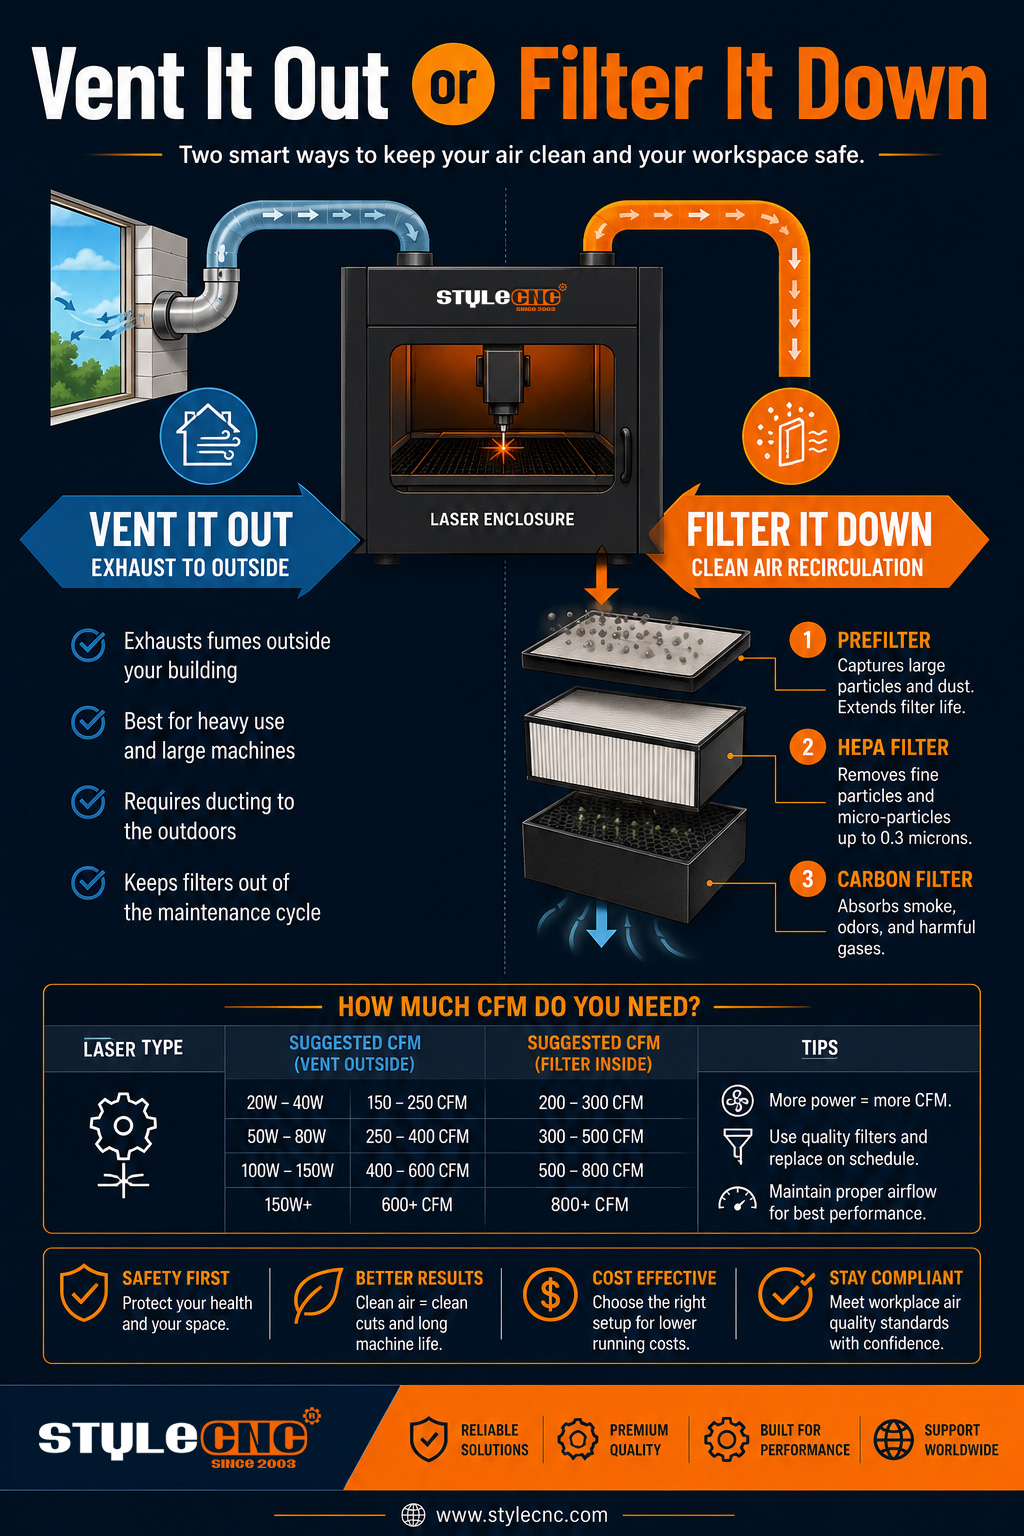
Ducted Exhaust vs Filtered Extractor
Route one sends everything outdoors through a sealed duct. Route two captures everything in stages inside a unit such as the air filter fume extractor for laser machines, then returns cleaned air to the room.
| Attribute | Ducted Exhaust Outdoors | Filtered Fume Extractor |
| Measurement | Typical airflow 200-1000 CFM inline fans | Typical airflow 100-500 CFM rated units |
| Upfront cost | Low: fan, duct, wall plate | Higher: multi-stage filtered unit |
| Running cost | Fan electricity only | Filter media on a schedule |
| Placement | Needs a wall or window route | Sits anywhere near the machine |
| Odor control | Smell exits the building | Carbon stage captures it indoors |
| Best fit | Fixed shops with outdoor access | Rentals, offices, cold climates |
Many shops run both: ducted exhaust as the daily workhorse, a filtered unit for winter nights and late hours.
How Much Airflow: Sizing the Fan
Size from enclosure volume, not laser wattage. The goal is a complete air change every few seconds, with gentle negative pressure holding smells inside the cabinet.
| Machine Class | Typical Enclosure | Minimum Airflow | Duct Diameter |
| Measurement | interior volume, cubic feet | CFM, with m³/h in brackets | mm, with inches in brackets |
| Desktop diode enclosure | 8-15 | 100-180 (170-300 m³/h) | 100 (4 in) |
| Desktop CO2 cabinet | 10-20 | 150-250 (250-420 m³/h) | 100 (4 in) |
| Cabinet CO2, 60W to 100W | 25-45 | 300-500 (510-850 m³/h) | 150 (6 in) |
| Fiber marker with hood | 4-8 | 80-150 (140-250 m³/h) | 75-100 (3-4 in) |
| Large flatbed or dual head | 60 and up | 600-1000 (1020-1700 m³/h) | 200 (8 in) |
Ratings on fan boxes assume zero duct. Real runs with bends deliver less, so buy the next size up whenever the route is long.
Give the room a makeup air path and confirm flow with a smoke test at the lid. For production volumes, NIOSH exposure resources are the reference worth bookmarking.
Key Numbers Worth Remembering
• Fine laser smoke particulate sits well below 2.5 microns, the size fraction that reaches deep lung tissue.
• A single 90 degree elbow can cost a duct run a noticeable share of its rated airflow, so plan straight lines first.
• Carbon stages usually give out before HEPA stages; smell breakthrough is the change signal.
• Negative pressure inside the enclosure is the target: air should leak inward, never outward.
• A complete enclosure air change every few seconds keeps the viewing window clear and the optics cleaner for longer.
Questions Operators Actually Ask
What setup works in a rented apartment with no window mods?
A sealed enclosure feeding a filtered extractor with a generous carbon stage. Nothing penetrates a wall, nothing bothers the landlord, and filter media becomes your only running cost.
Can a window box fan handle a small diode enclosure?
It moves air but has almost no static pressure, so a few duct bends kill it. A rated inline duct fan at the same price outperforms it through any real run.
Where does the replacement air come from?
From the room, so give it a path. Crack a door or add a vent; a sealed room starves the fan, and the airflow number printed on the box never arrives.
Common Mistakes That Undo the Fan
• Running a powerful exhaust fan with no makeup air path into the room.
• Venting into an attic, crawl space, or attached garage.
• Letting flex duct sag through five bends on the way to a window.
• Sizing the fan by laser wattage instead of enclosure volume.
• Waiting for smell before changing the carbon stage.
• Cutting PVC or vinyl just once to finish a rush job.
• Ignoring lid seals; a leaky enclosure beats the best fan.
• Treating odor as the hazard while invisible fine particulate drifts.
Ventilation Setup Checklist
✓ Choose the route first: ducted outdoors, or filtered recirculation.
✓ Size airflow from enclosure volume, not laser wattage.
✓ Keep duct runs short, straight, and smooth-walled.
✓ Provide a makeup air path into the room.
✓ Smoke-test the enclosure and confirm negative pressure.
✓ Log filter hours and change carbon before breakthrough.
✓ Ban PVC, vinyl, and unknown plastics from the material shelf.
Frequently Asked Questions
Is engraving wood actually harmful, or just smelly?
Both. Wood smoke carries fine particulate small enough to reach deep lung tissue, plus aldehydes from the burn. One job leaves a smell; years of unvented jobs leave a respiratory history. Treat plain pine with the same extraction discipline as any plastic.
Why does my extractor still smell with fresh filters?
Odor breakthrough usually means the carbon stage is saturated or air is bypassing a bad seal. Check gaskets and filter order first: prefilter, then HEPA, then carbon. Carbon exhausts long before HEPA does, so on smelly materials it often needs changing twice as often.
Can I vent into the garage or attic instead of outside?
No. Both spaces leak back into the living envelope, so the fumes take a detour and return. Terminate the duct at an outside wall or window plate with a backdraft damper, and keep the run sealed with foil tape rather than cloth duct tape.
How do I know my airflow is actually enough?
Watch the smoke. It should sweep toward the outlet and clear within a few seconds of the beam stopping. Lingering haze, smell escaping the lid, or smoke drifting toward the door all say the fan is undersized or the duct is choking it.
I cut PVC once by accident. How bad is it?
Once will not destroy the machine, but the released gas forms an acid with moisture that pits optics, rails, and lungs alike. Air the space out fully, wipe the interior down, and retire the material. Repeated exposure is where the real damage compounds.
Do fiber metal markers need extraction too?
Yes. Marking vaporizes metal into oxide fume, and coating burn-off adds organics on painted or coated parts. The volumes are smaller, so a compact hood and a modest extractor handle it, but breathing metal fume unfiltered is a welder-grade mistake.
How often do the carbon and HEPA stages need replacing?
Carbon goes by smell: the first hint of odor at the outlet means breakthrough. HEPA goes by pressure drop or hours, often lasting several carbon cycles. Log run hours per material, because one acrylic-heavy month can age filters faster than a quiet quarter.
Does a long duct really hurt performance that much?
Yes. Every elbow and every meter of ridged flex hose adds resistance, and small inline fans lose flow quickly against it. Keep the run short, swap flex for smooth-wall duct where possible, and step up the fan when the route cannot shrink.
Will better ventilation fix the smell on finished parts?
Only partly. Airborne smell leaves with the exhaust, but residue baked onto the workpiece keeps its own odor. Air assist during the job, masking tape on show faces, and an alcohol wipe afterward handle the part; the extractor handles the room.
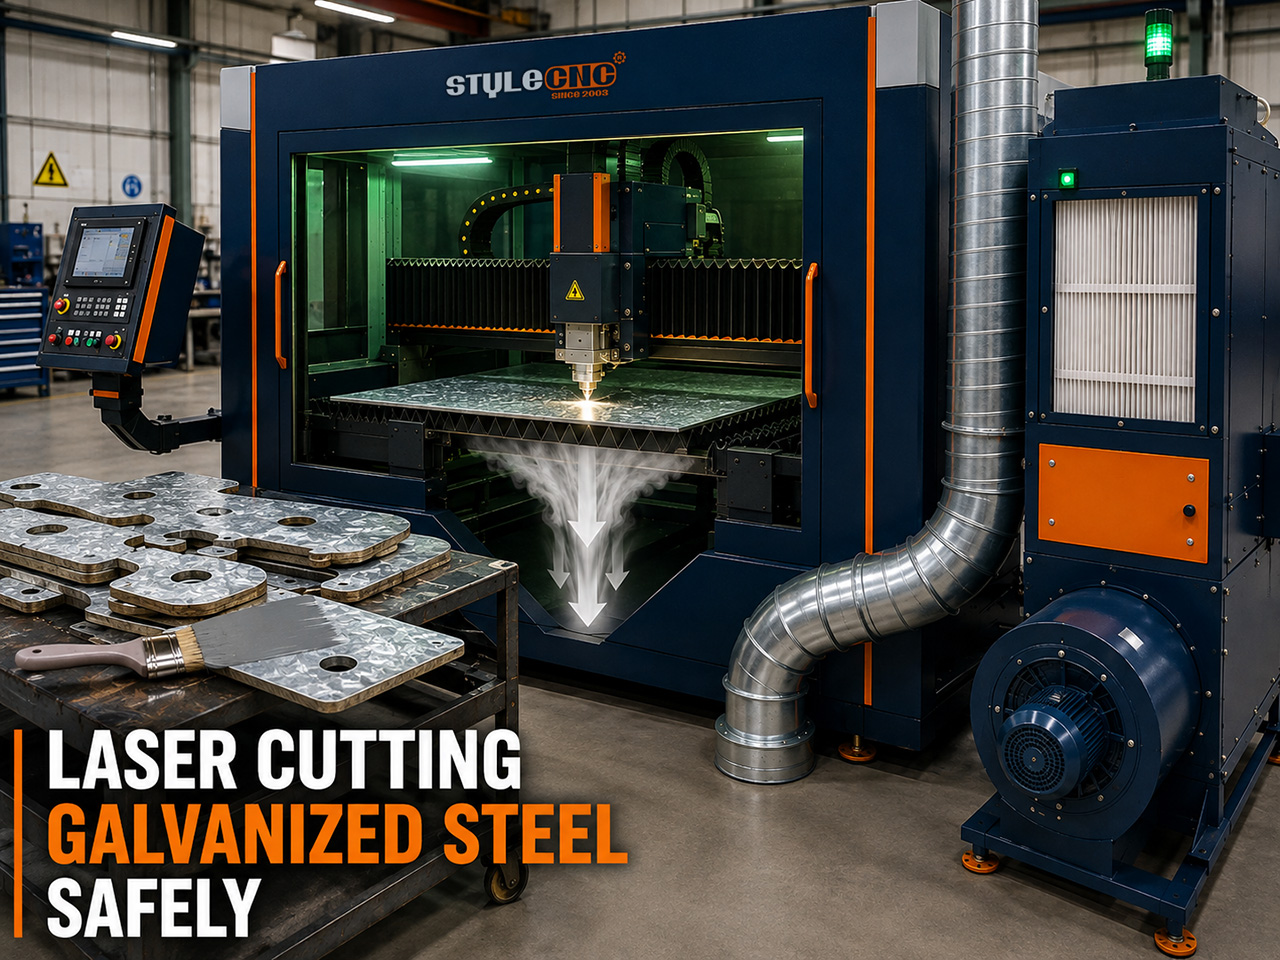
Galvanized steel is everywhere in fabrication: HVAC ducting, enclosures, agricultural equipment, automotive panels. Cutting it is a routine, safe production process on a correctly equipped machine, and a genuine health hazard on one without fume handling. This guide covers the physics, the illness, the extraction requirements that decide the safety question, and the parameter and edge-rust details that decide cut quality.
What Happens When the Laser Hits Zinc
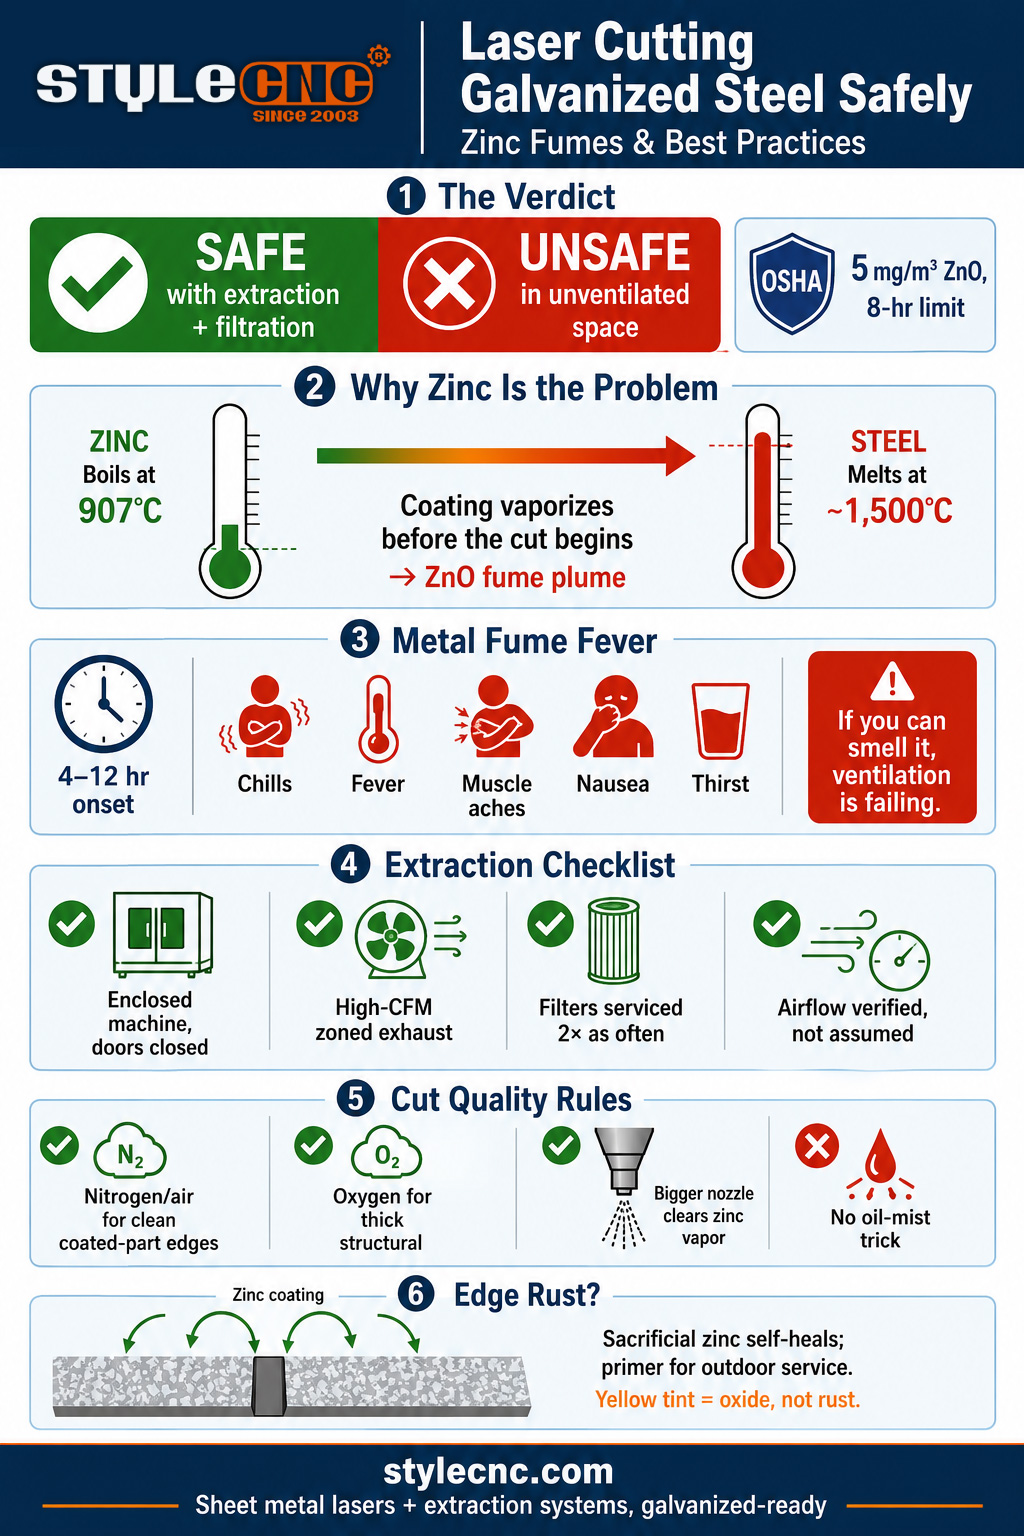
Galvanized steel is ordinary carbon steel wearing a thin zinc jacket, and the two metals part ways the instant the beam arrives. Zinc boils at roughly 907 degrees C, far below the temperature at which steel even fully melts. So before the cut proper begins, the coating around the kerf flashes into vapor, reacts with oxygen, and erupts as a plume of fine white zinc oxide particulate riding the assist gas out of the cut.
That plume is the entire safety story. The steel itself cuts like any mild steel; the vaporized coating is what fills an unventilated shop with white haze and puts the operator at risk. Solve the fume, and galvanized becomes routine work.
Metal Fume Fever: The Hazard by Name
Inhaled zinc oxide fume causes metal fume fever, the illness welders call the zinc shakes or Monday morning fever. Symptoms arrive 4 to 12 hours after exposure: chills, fever, muscle aches, nausea, and unusual thirst, typically resolving within about a day. NIOSH literature reports no known long-term effects from isolated episodes, but repeated exposure is linked to lasting respiratory problems.
The regulatory line is concrete: OSHA's permissible exposure limit for zinc oxide fume is 5 milligrams per cubic meter averaged over an 8-hour shift, with NIOSH setting the same recommended limit. The practical shop translation used across the industry is blunt and useful: if you can smell the fume or see haze in the air, the extraction is insufficient and the limit is likely being exceeded.
Fume Extraction: The Requirement That Decides the Answer
Every credible answer to the safety question, from occupational health literature to machine manufacturers, converges on the same point: extraction and filtration are the deciding factor. The working checklist:
✓ Enclosed machine, doors closed: An enclosure turns the fume plume from a room problem into a duct problem. Open-frame cutting of galvanized indoors is the scenario that produces sick operators.
✓ High-flow exhaust matched to the bed: A dedicated high-CFM exhaust fan and dust collector pulls the plume down and out before it escapes the enclosure. Zoned or segmented extraction, which concentrates suction where the head is cutting, handles heavy galvanized work best.
✓ Filtration serviced on an accelerated schedule: Zinc oxide particulate is fine and sticky and loads filters roughly twice as fast as mild steel dust. A clogged filter quietly turns a compliant system into a non-compliant one, so inspection intervals for galvanized work should be tighter than the steel-only schedule.
✓ Airflow verified, not assumed: The smell-and-haze test is the everyday check; periodic air monitoring against the 5 mg/m3 limit is the formal one for shops running galvanized at volume.
On the machine side, STYLECNC laser systems pair with the exhaust fan and dust collector for laser cutting machines for exactly this duty, and the laser cutter safety guide covers the full operating checklist that fume handling slots into.
One more reason extraction pays for itself: zinc dust is electrically conductive and abrasive. Left uncollected, it settles into control cabinets and bridges circuit boards, coats the cutting lens until absorbed heat cracks it, and grinds away at motion components. Fume handling protects the machine as much as the operator.
Cutting Parameters and Assist Gas for Galvanized Sheet
Quality problems on galvanized trace back to the same low-boiling zinc: spatter near the kerf, bottom dross, and coating peel along the edge. The countermeasures are parameter-level.
✓ Assist gas by outcome: Nitrogen or high-pressure air gives the cleanest, oxide-minimal edge for parts that will be seen or powder-coated; expect a normal yellow-tan tint on the cut face. Oxygen cuts thicker sheet faster and cheaper at the cost of a more oxidized edge. Both are legitimate; choose by the part's next process.
✓ Larger nozzle for the vapor load: Nozzles around 1.5 to 2.5 mm, sized up with thickness, move the gas volume needed to clear zinc vapor from the kerf before it redeposits as spatter and dross.
✓ Speed is your friend: Higher power cutting faster gives the heat less time to spread, which directly reduces zinc peeling and the burned-coating margin along the edge. A fast clean pass beats a slow careful one on this material.
✗ Skip the oil-mist trick: Some operators mist oil on the sheet to stop spatter sticking. It works for spatter and backfires everywhere else, adding smoke to the fume load and contaminating the lens. Proper gas settings and good nozzles solve the same problem cleanly.
Will Laser-Cut Galvanized Edges Rust?
The cut edge is bare steel where the beam removed the coating, but two things protect it. Zinc corrodes sacrificially, so the surrounding intact coating electrochemically defends the narrow exposed band, partially self-healing the cut line. For indoor and sheltered applications the edge typically performs fine as cut, and the yellow-tan oxide tint is cosmetic, not a failure sign.
For outdoor, marine, or high-humidity service, restore the barrier: brush or spray zinc-rich primer on cut edges, or specify post-cut touch-up in the finishing routine. Parts headed for powder coat get their protection back from the coating system itself, which is one more reason the cleaner nitrogen or air edge is worth choosing for coated work.
The Right Machine Setup for Galvanized Work
Galvanized sheet is core territory for the sheet metal laser cutter class: enclosed fiber laser platforms in the thin-to-medium gauge range where ducting, enclosures, and panel work live, configured with the exhaust and filtration circuit that makes the safety answer yes. Send the STYLECNC team your gauges, monthly volume, and shop ventilation situation for a configuration that covers both the cut quality and the air quality sides of galvanized production.
Frequently Asked Questions
Can you laser cut galvanized steel?
Yes, routinely. Fiber lasers cut galvanized sheet in production across HVAC, enclosure, automotive, and agricultural fabrication. The steel substrate cuts like ordinary mild steel; the zinc coating is the complicating factor, vaporizing into zinc oxide fume that must be captured by the machine's extraction system. On an enclosed machine with working fume handling, it is a standard job. Without extraction, it is the one common material that can make an operator genuinely ill.
What do zinc fumes do to you?
Inhaled zinc oxide causes metal fume fever: chills, fever, muscle aches, nausea, and marked thirst arriving 4 to 12 hours after exposure and resolving in roughly a day. NIOSH literature reports no known long-term harm from an isolated episode, but repeated exposure is linked to chronic respiratory problems. OSHA's exposure limit is 5 mg/m3 of zinc oxide fume averaged over 8 hours, and the practical rule is stricter: if you can smell it, fix the ventilation.
What assist gas is best for galvanized steel?
Choose by the part's destination. Nitrogen or high-pressure compressed air gives the cleanest edge with minimal oxide, the right pick for visible parts and anything headed to powder coat; the yellow-tan tint it leaves is normal. Oxygen cuts thicker galvanized faster and cheaper with a more oxidized edge, fine for structural work. Either way, run a larger nozzle than plain steel would need, because clearing the zinc vapor is what prevents spatter and dross.
Do laser-cut galvanized edges rust?
Slower than the bare-steel edge suggests. Zinc protects sacrificially, so the intact coating beside the cut electrochemically defends the narrow exposed band, and indoor or sheltered parts generally perform fine as cut. For outdoor or humid service, touch up cut edges with zinc-rich primer or rely on the downstream coating system. The yellow discoloration on nitrogen or air cuts is surface oxide, not rust, and not a defect.
Is special ventilation required, or is shop air enough?
Standard shop ventilation is generally not enough for galvanized at production volume; the consensus across manufacturers and safety literature is a dedicated extraction and filtration system on an enclosed machine. Zinc oxide particulate also clogs filters about twice as fast as mild steel dust, so galvanized-heavy shops need tighter filter service intervals. Enclosure closed, exhaust on, filters fresh, no smell: that is the operating standard.
The Bottom Line
The safety of laser cutting galvanized steel is not a property of the material; it is a property of the machine setup. Zinc will vaporize every time, metal fume fever is real, and the OSHA limit is specific. An enclosed machine with high-flow extraction, fresh filtration, and a no-smell standard makes galvanized a routine material. Add the right gas, a bigger nozzle, honest speed, and zinc-rich primer where the service environment demands it, and both the operator and the parts come out fine.
STYLECNC configures sheet metal fiber lasers with the extraction and dust collection systems galvanized work requires. Ask the team for a galvanized-ready configuration matched to your gauges and volume.
Can a Fiber Laser Cut Brass and Copper?
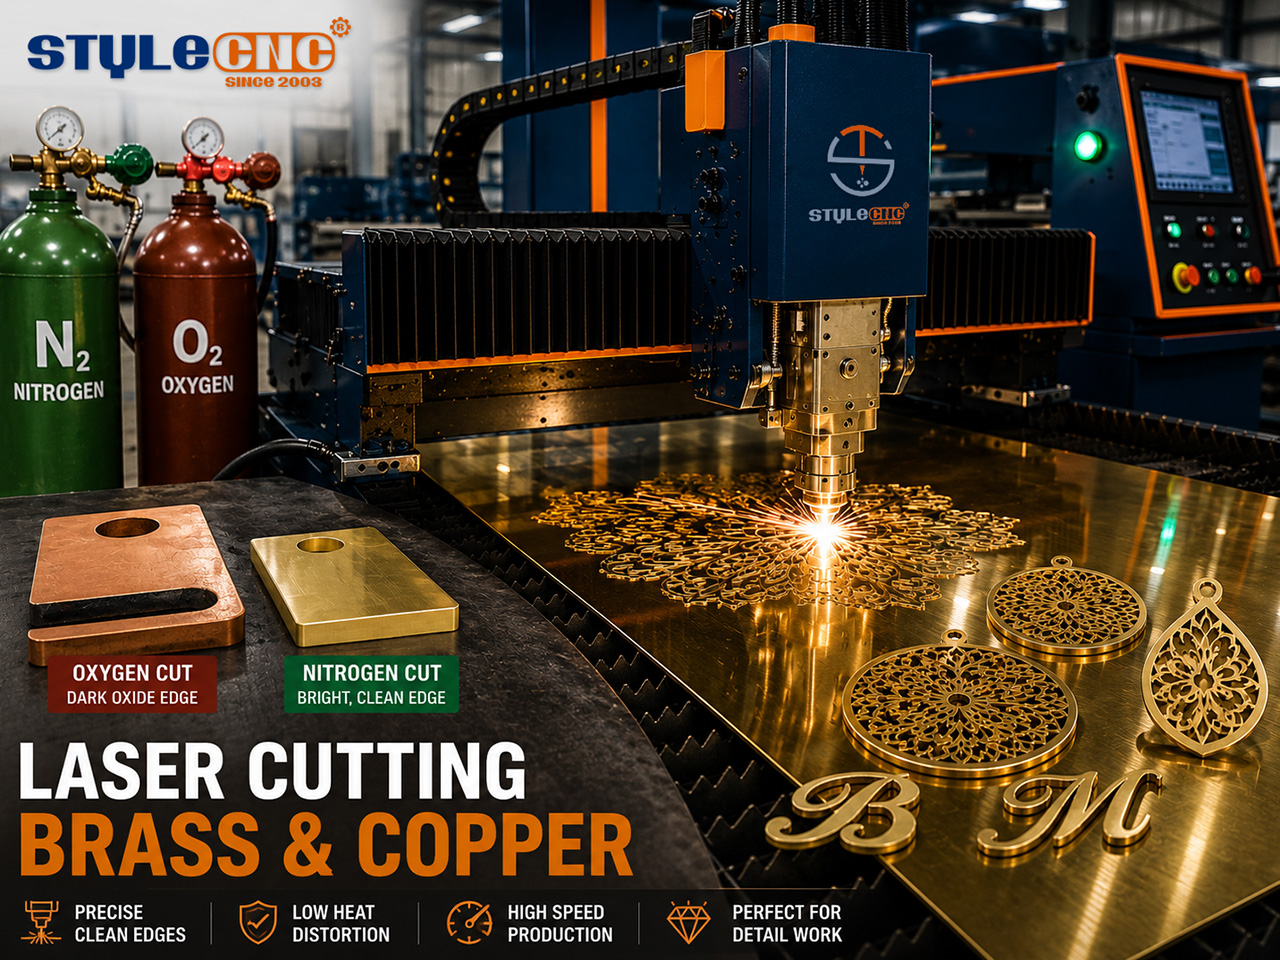
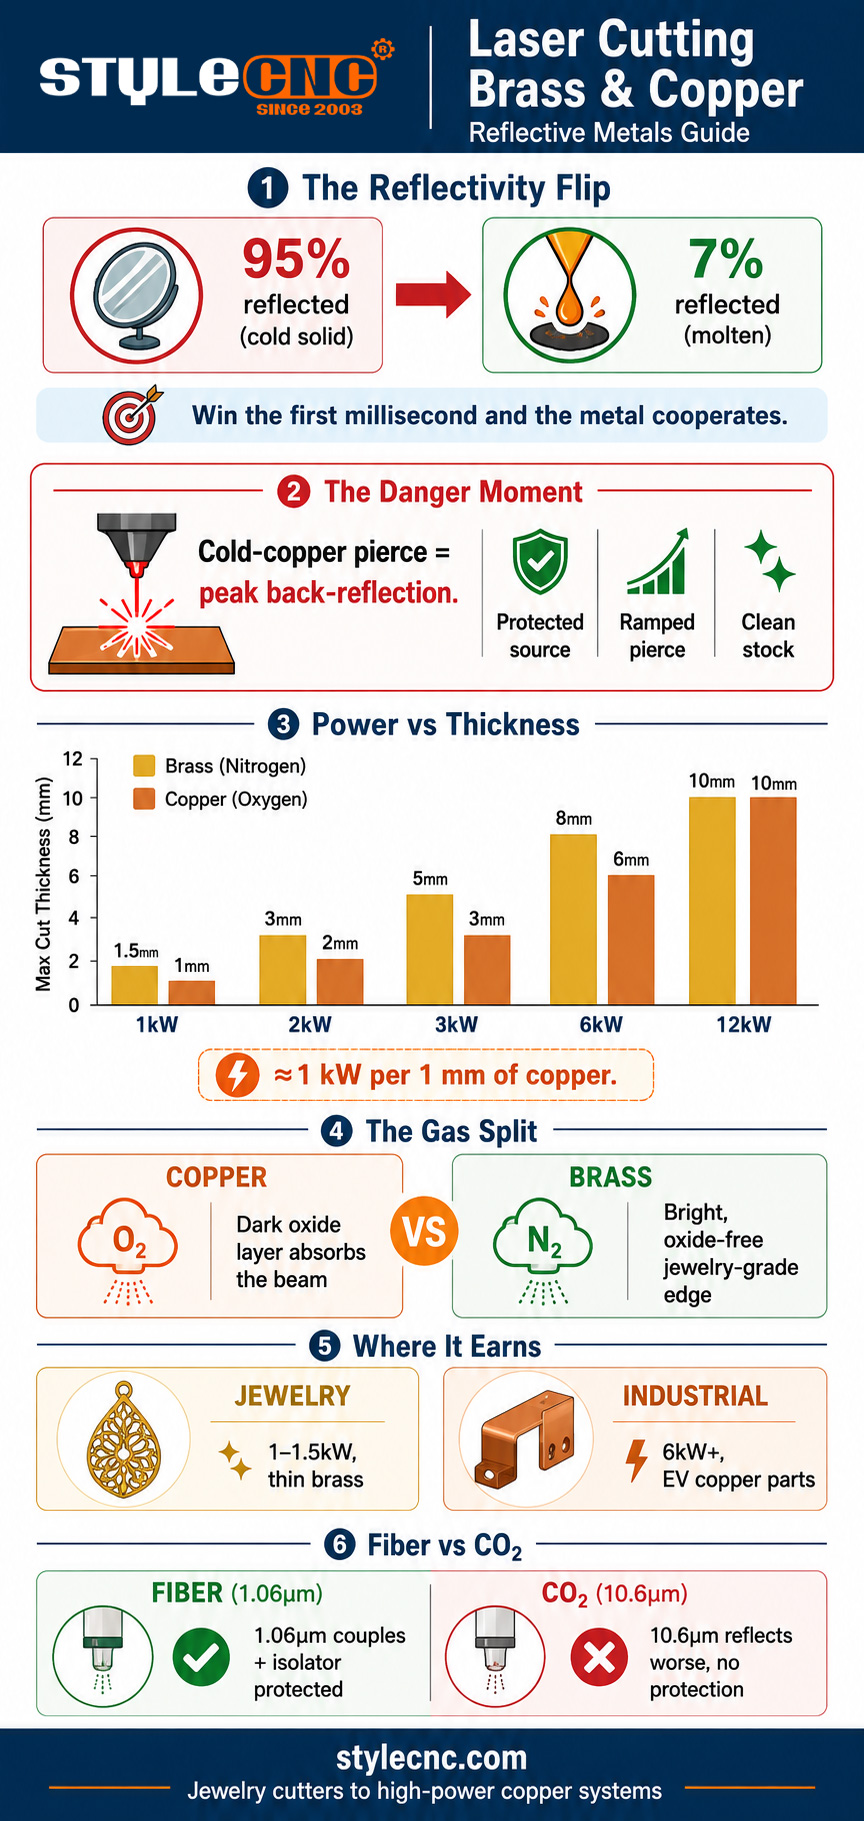
Yes. Modern fiber lasers cut brass and copper routinely because their 1064 nm wavelength couples into these metals far better than a CO2 laser's 10.6 micron beam, and current sources ship with back-reflection protection. Plan on roughly 1 kW of power per 1 mm of copper, high-pressure oxygen for copper, nitrogen for brass, and 2 kW and up for reliable production work.
The physics that makes it possible is a temperature trick. Copper's reflectivity is about 95 percent when cold and solid, but it collapses to roughly 7 percent once the metal melts. A fiber laser wins by brute-forcing that transition: maximum power density on a small spot melts the surface in milliseconds, and from that instant the metal absorbs the beam almost completely and cutting proceeds normally. The entire challenge of reflective metals is compressed into the moment before the melt pool exists.
Back-Reflection: Where the Real Risk Lives
That pre-melt moment is the pierce, and it is the highest-risk event in the whole cutting sequence. A full-power continuous pierce into cold, mirror-bright copper sends the maximum possible reflected energy straight back up the beam path in the first fraction of a second. On older, unprotected sources, that return light could damage the delivery fiber or the laser module itself, which is where the folklore about lasers and copper comes from.
Three things retired that folklore. Modern fiber sources ship with back-reflection isolation and sensors that fault the laser before damage, often backed by reflection-monitoring shutdown logic. Piercing routines changed: ramped or pulsed pierces keep the mirror phase to milliseconds instead of dwelling at full power on cold metal. And surface preparation became standard, because oil, oxide films, and moisture all raise reflection.
The buying implication is simple: for brass and copper work, confirm in writing that the source, cutting head, and protection systems are rated for reflective metals at your thickness. Parts can look fine while an unrated machine quietly absorbs damaging return light.
Why Fiber Beats CO2 on Reflective Metals
The wavelength gap decides this one before any other spec matters. Copper and brass reflect the CO2 laser's 10.6 micron beam even more strongly than the fiber laser's 1.06 micron beam, so a CO2 machine starts the fight with several times less energy coupling and a worse back-reflection problem, with no protective isolator technology to compensate. CO2 systems keep their place in non-metals and some thick-plate niches, but for brass and copper the industry verdict is settled: fiber or nothing.
The same wavelength advantage is the foundation of the whole fiber category, covered in depth in the fiber laser technology guide. For reflective metals it converts directly into lower minimum power, faster piercing, and a safer optical path.
Minimum Power and Thickness Limits
The working rule of thumb for copper is roughly 1,000 W of power per millimeter of thickness, with brass slightly more forgiving because its zinc content absorbs better. The table below translates that into practical windows.
| Laser Power | Brass (Production) | Copper (Production) | Typical Work |
|---|---|---|---|
| 1 kW | Up to 1.5 mm | Up to 1 mm | Jewelry, tags, thin sheet |
| 2 kW | 2 to 3 mm | 1.5 to 2 mm | Signage, decorative panels |
| 3 kW | 4 to 5 mm | 3 mm | General fabrication |
| 6 kW | 6 to 8 mm | 5 to 6 mm | Busbars, electrical parts |
| 12 kW+ | 10 mm+ | 8 to 10 mm+ | Production copper/brass plate |
Two parameter habits keep cuts inside the safe window. Run the highest peak power the source allows, because power density is what shortens the reflective phase, then back the feed rate off 10 to 15 percent from the maximum that severs, buying process margin. And keep focus at or very near the material surface for both pierce and cut; reflective metals punish defocus faster than steels do.
The Gas Strategy That Splits Brass from Copper
Here is the counterintuitive part: the two metals want different gases, and the copper answer breaks the usual clean-cutting rule.
✓ Copper: high-pressure oxygen. Oxygen reacts with the copper surface to form a dark oxide layer, and that darkness is the point: copper oxide absorbs the beam far better than bright copper reflects it. From about 2 mm up, nitrogen-only copper cutting stalls and oxygen becomes mandatory for a reliable pierce and cut.
✓ Brass: nitrogen. Brass behaves closer to a conventional metal thanks to its zinc content, so nitrogen delivers what it always delivers: an oxide-free, bright, clean edge that suits decorative and jewelry work straight off the table. Alloy composition shifts behavior, so parameter-test each new brass grade.
✓ Both: clean stock first. Oil, oxidation films, coatings, and moisture all raise surface reflection. Wiping stock down before cutting is the cheapest back-reflection protection available.
Where Brass and Copper Cutting Earns Money
Jewelry and small decorative work is the natural entry point: brass sheet under 1.5 mm cuts cleanly on compact 1 to 1.5 kW machines, and the laser metal jewelry cutter is configured exactly for that class of work, with the fine-feature accuracy that pendants, earring blanks, and filigree pieces demand. Signage is the second natural fit: brass letters, logo plates, and architectural trim trade on the bright nitrogen-cut edge that needs no rework before polishing or patina.
At the industrial end, copper busbars, transformer parts, and electrical connectors are volume laser work, and EV battery production has multiplied the demand. That is 6 kW-and-up territory, where the high-power fiber laser metal cutting machine class carries the power density and gas delivery that production copper requires. For proof at the mid-range, STYLECNC's 2000 W fiber laser cutting copper demonstration shows the process running on real material.
Frequently Asked Questions
Will cutting copper damage my fiber laser?
Not on a modern, properly configured machine. The risk window is the pierce into cold copper, when reflectivity sits near 95 percent and return light peaks. Current sources ship with back-reflection isolation and monitoring that fault safely, and ramped piercing keeps the mirror phase to milliseconds. The caveat: get written confirmation that your source and head are rated for copper at your thickness.
Why is oxygen used for copper but nitrogen for brass?
Because copper's problem is reflection and oxygen solves it chemically: the oxide layer it forms is dark and absorbs the beam dramatically better than bright copper. Below about 1 mm, nitrogen can manage; from roughly 2 mm, oxygen becomes necessary. Brass, helped by its zinc content, absorbs well enough that nitrogen's usual benefit wins instead: a bright, oxide-free edge ready for polishing, which is exactly what decorative and jewelry work needs.
How much power do I need to cut brass sheet?
For jewelry and thin decorative brass up to about 1.5 mm, 1 kW is enough and cuts cleanly. Signage-gauge brass at 2 to 3 mm wants 2 kW. General fabrication at 4 to 5 mm sits in 3 kW territory, and thick brass plate moves into 6 kW and beyond. Brass runs slightly thicker than copper at every power level because it absorbs the fiber wavelength better.
Can a CO2 laser cut brass or copper?
Effectively no, and it should not be attempted on machines without reflective-metal protection. Both metals reflect the 10.6 micron CO2 wavelength even more strongly than the fiber wavelength, so coupling is worse and back-reflection risk higher, with no isolator technology in the optical path. This is one of the clearest cases in metal cutting where the fiber laser is not just better but categorically the right tool.
Why do my brass cuts vary between material batches?
Brass is a family of copper-zinc alloys, not one material, and the zinc fraction that helps absorption varies by grade. Higher-zinc alloys cut more easily; leaded free-machining grades behave differently again. Surface condition adds a second variable, since oxidation and films change reflection. The working fix is the same as for aluminum alloys: keep parameters per grade and run a short test cut when a new batch lands.
The Bottom Line
Brass and copper stopped being forbidden metals the day fiber sources got back-reflection protection and operators learned to respect the pierce. The recipe is consistent: maximum power density to blow through the reflective phase, focus tight to the surface, oxygen for copper and nitrogen for brass, clean stock, and roughly a kilowatt per millimeter of copper as the sizing rule.
STYLECNC configures fiber lasers across that whole range, from the jewelry-class metal cutter for thin brass work to high-power systems for production copper. Send the STYLECNC team your metals, thicknesses, and volumes for a reflective-metal-rated configuration and gas recommendation.
Note: If you can't find your answer in the FAQs above, please ask a new question in the form below.
Ask Your Question
Asking questions is essential in CNC machining for fostering understanding and encouraging exploration, allowing individuals to gain deeper insights and challenge assumptions, ultimately facilitating learning and innovation.